Introduction
I’m moving and I have finally access to a Deutsche Glasfaser Fiber to the home account. Additionally I don’t want to use AVM products anymore. So this time I’m giving the linux Router distribution OpenWRT a chance. I’ve ordered a Raspberry Pi Compute Modul 4 and combined it with a DFRobot Router Board.
OpenWRT 22.03.2
DFRobot offers an Image for 21.02.3, but not for 22.03.2. So I want to document what I need to do, to get one updated to the latest version.
eMMC Installation
These are the requirements for the eMMC installation:
- USB-C data cable - cannot recommmend, as it isn#t detected. However, I was able to connect using an older USB-A to USB-C adapter cable
- Balena Etcher
- Keka
- usbboot
- System Image
usbboot installation
The connected Pi with eMMC storage will show up as USB mass storage and can be written like a SD card.
git clone --depth=1 https://github.com/raspberrypi/usbboot
cd usbboot
brew install libusb
brew install pkg-config
make
You’ll need to connect the Raspberry Pi CM before you’ll proceed with sudo ./rpiboot
Enter Boot Mode
The DFRobot router board has a physical switch called ‘RPiBOOT’. Its default to 0 and if its switched its set to 1. This disables the eMMC startup and it will appear as a mass storage when started.
Connect the USB-C cable to the USB Data port of the Router board and plug it into your Mac. Connect the official USB-C power adapter to the power USB-C port of the Router board.
Start rpiboot with sudo ./rpiboot
If everything is working, the pi should appear as a mass storage that can be written too:
RPIBOOT: build-date Nov  9 2022 version 20221104~153421 4a21a619
Waiting for BCM2835/6/7/2711...
Loading embedded: bootcode4.bin
Sending bootcode.bin

Successful read 4 bytes
Waiting for BCM2835/6/7/2711...
Loading embedded: bootcode4.bin
Second stage boot server
Loading embedded: start4.elf
File read: start4.elf
Second stage boot server done
Create system image with openwrt.org page
This is the preferred and faster way. Go to openwrt.org and open the firmware selector for 22.03.2.
Enter Raspberry and select Raspberry Pi 4B/400/4CM (64bit). Adjust the installed packages and add kmod-r8169 kmod-usb-dwc2 bcm27xx-userland. Request the firmware and download all offered images.
Update for 23.05.0: A lot changed under the hood. The only working minimal package selection were for me the default packages and kmod-usb-dwc2. Everything else was either part of the package list or part of the Raspberry Pi base image (looking at bcm27xx-userland). Also make sure you’ll open the firmware selector for 23.05.0 in Chrome. Otherwise the download buttons did not work for me.
Make sure that the generated sha256sum fit to your downloaded files, e.g.
shasum -a 256 openwrt-23.05.0-14d945d583a7-bcm27xx-bcm2711-rpi-4-squashfs-factory.img.gz
82ffbaa64ac18d11db3da09bb5c27c82bfff35ab74dfedef08f5d9ccff285a1d  openwrt-23.05.0-14d945d583a7-bcm27xx-bcm2711-rpi-4-squashfs-factory.img.gz
shasum -a 256 openwrt-23.05.0-14d945d583a7-bcm27xx-bcm2711-rpi-4-squashfs-sysupgrade.img.gz
4b8828bd9881342039de6f04ccdfb21e602f53063cf13a46526423867c1527ba  openwrt-23.05.0-14d945d583a7-bcm27xx-bcm2711-rpi-4-squashfs-sysupgrade.img.gz
Create a new system image - manually
Following the instructions from this gist:
Download the latest image builder for Raspberry Pi from OpenWRT: https://downloads.openwrt.org/releases/22.03.2/targets/bcm27xx/bcm2711/ and extract it:
wget https://downloads.openwrt.org/releases/22.03.2/targets/bcm27xx/bcm2711/openwrt-imagebuilder-22.03.2-bcm27xx-bcm2711.Linux-x86_64.tar.xz
tar Jxf openwrt-imagebuilder-22.03.2-bcm27xx-bcm2711.Linux-x86_64.tar.xz
cd openwrt-imagebuilder-22.03.2-bcm27xx-bcm2711.Linux-x86_64/
mkdir -p files/etc/config
Create a default network configuration. The content should be placed in files/etc/config/network
config interface 'loopback'
        option proto 'static'
        option ipaddr '127.0.0.1'
        option netmask '255.0.0.0'
        option device 'lo'

config globals 'globals'
        option ula_prefix 'fdff:ac50:10da::/48'

config interface 'wan'
        option proto 'dhcp'
        option device 'eth0'

config interface 'lan'
        option proto 'static'
        option ipaddr '192.168.1.1'
        option netmask '255.255.255.0'
        option device 'eth1'
Get a Debian/Ubuntu based VM and install these dependencies:
sudo apt install make unzip bzip2
Now you can build the firmware using make image PROFILE="rpi-4" PACKAGES="luci kmod-r8169 kmod-usb-dwc2 bcm27xx-userland" FILES=files/
The resulting images will be in bin/targets/bcm27xx/bcm2711/:
ls bin/targets/bcm27xx/bcm2711/
openwrt-22.03.2-bcm27xx-bcm2711-rpi-4-ext4-factory.img.gz
openwrt-22.03.2-bcm27xx-bcm2711-rpi-4-ext4-sysupgrade.img.gz
openwrt-22.03.2-bcm27xx-bcm2711-rpi-4-squashfs-factory.img.gz
openwrt-22.03.2-bcm27xx-bcm2711-rpi-4-squashfs-sysupgrade.img.gz
openwrt-22.03.2-bcm27xx-bcm2711-rpi-4.manifest
profiles.json
sha256sums
Use the factory image and copy it on your mac.
Extract the system image
Extract the downloaded system image with Keka. You’ll get a file like openwrt-22.03.2-bcm27xx-bcm2711-rpi-4-squashfs-factory.img
Write image to eMMC using Balena Etcher
- Start Balena Etcher
- Flash from file and point to the extracted
.imgfile - Select target and select the mounted eMMC of the Pi
- Click on Flash
- Wait for the Flash process to finish and verify
Turn of Boot Mode
The DFRobot router board has a physical switch called ‘RPiBOOT’. Its default to 0 and if its switched its set to 1. You’ve done this already when you’ve flashed the system, but it needs to be disabled before the written image can be started from eMMC.
Disconnect the Pi from power and turn that switch back to 0.
First Boot
Now power the Pi again without connection to the Mac and install a network cable to ETH1, which is next to the Power USB-C port. The other is ETH0, which is used for WAN connections.
Connect via a Switch or directly to the ETH0 port. This is the port which is the furthest away from the USB-C power connector. When the boot is complete, you should be able to use DHCP and get a valid IP assigned. Go to http://192.168.1.1 and open the management interface luci.
The default account is root without a password, so its wise to assign directly a new password for that account first.
Go to System, Administration and change the Router Password.
I'm also configuring a SSH key for authentication. Create one with e.g. ssh-keygen -t ed25519 -C "CM4 DFRobot OpenWRT" -f ~/.ssh/id_ed_cm4
Copy the created public key and enter it in Luci under Administration, SSH-Keys. Try to login with that key before you'll disable access with only SSH keys. This can be done in Luci under Administration, SSH Access, Allow the root user to login with password and remove the check.
Resizing to your needs
Now that the basic setup is done, you’ll have to resize the partitions of the eMMC. OpenWRT takes up as less as possible space to fit on all types of devices. To fully use the 32GB eMMC module, you’ll have to enter Boot mode again and make the eMMC mountable again.
Resize on your Mac
I’ve tried to adapt the steps from the DFRobot wiki. However, I was unable to modify them for macOS since fdisk behabes differently. I recommend resizing it on the pi directly
Resize remotely on OpenWRT
The following is only possible when you’ve connected the Pi to the internet. Connect now via SSH to the pi.
Install these packages:
opkg update
opkg install cfdisk resize2fs
Resize the partition which is listed on the bottom. You can see the partitions when you use cfdisk /dev/mmcblk0. The Free Space should be around the size of your Pi’s eMMC.
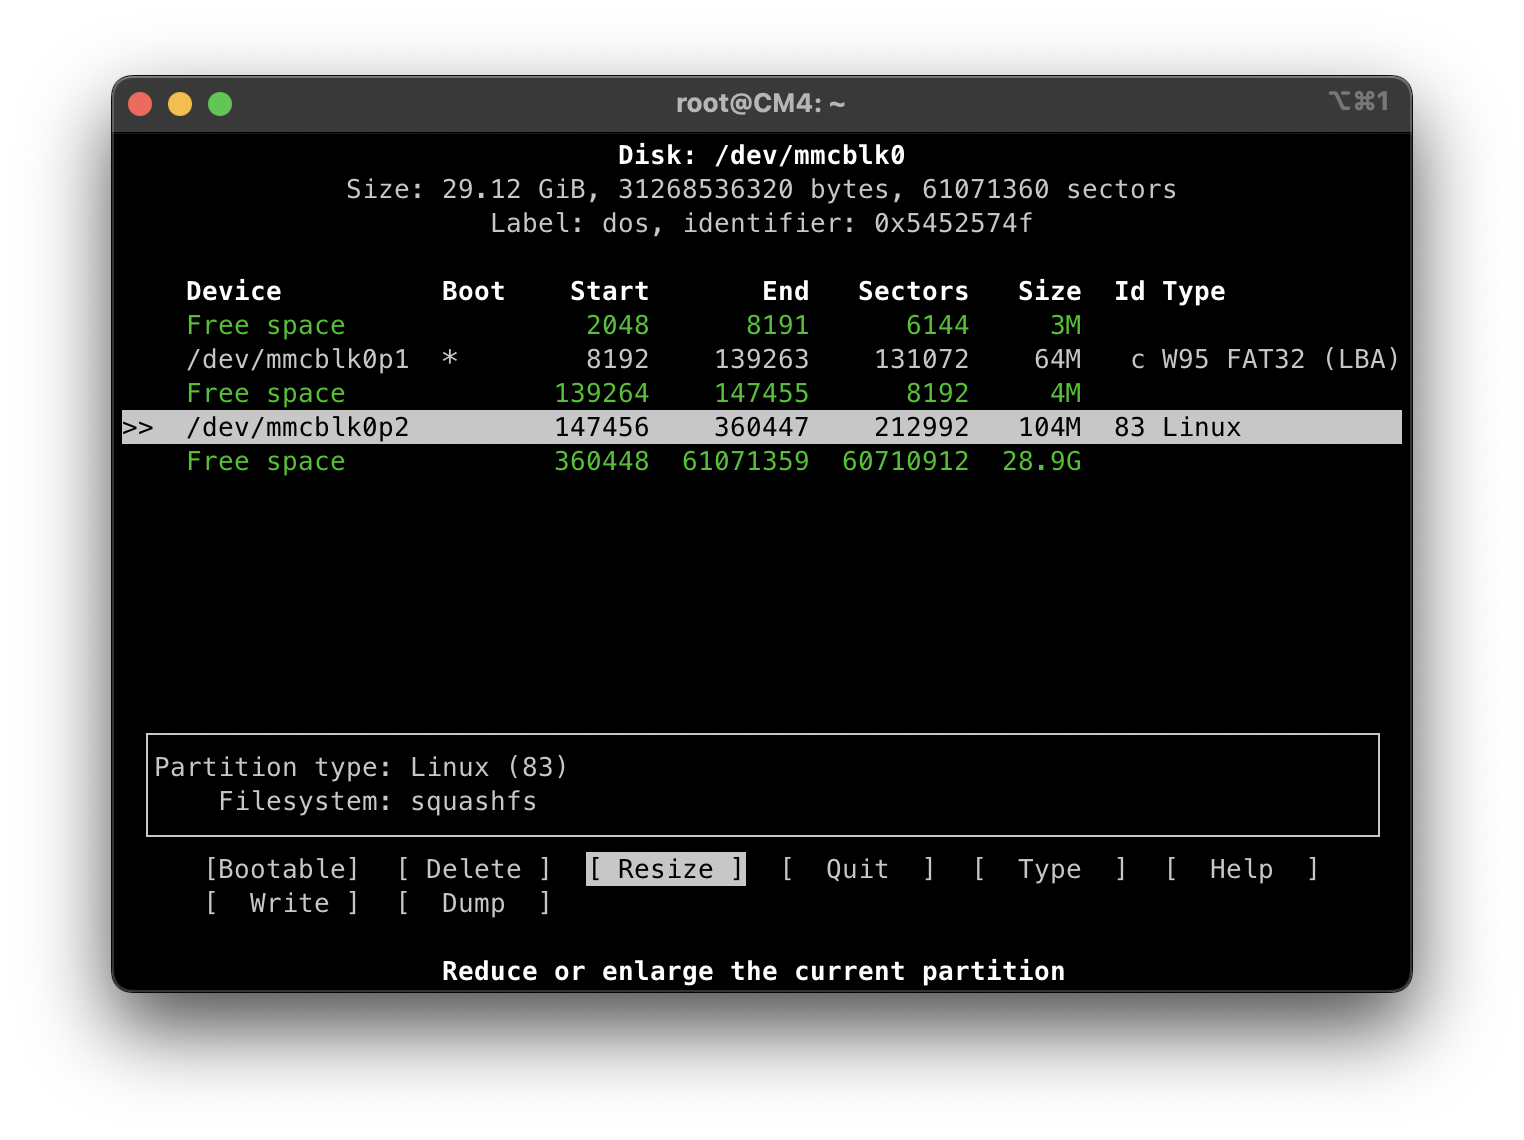
Accept the recommended size and write to the disk, then reboot the Pi.
Set the size of the new partition:
root@CM4:~# resize2fs /dev/loop0
resize2fs 1.46.5 (30-Dec-2021)
Filesystem at /dev/loop0 is mounted on /overlay; on-line resizing required
old_desc_blocks = 1, new_desc_blocks = 233
The filesystem on /dev/loop0 is now 30456704 (1k) blocks long.
Reboot the pi. Now check the available free disk space in Luci under Status, Overview. It should show around the size of your eMMC.
Setup a simple router
Now that you have got the pi running, we can start to configure a simple router functionality. Connect a LAN cable to ETH1, which is closed to the USB-C power. You have already connected your Mac to ETH0 and can reach the Luci web interface.
Go to Network, Devices and check that you see two network devices, eth0 and eth1 as well as br-lan. This means that the drivers are configured correctly and the network card of the DFRobot board is useable.
Under Network, Interfaces there`s already a br-lan. It bridges the internal lan to the ETH1 interface.
Click on Add new Interface and name it WAN4, DHCP Client and select Ethernet Adapter ETH0. Repeat this for IPv6 and name it WAN6. Edit those new devices and set wan as firewall-zone for these devices.
Setup docker
I wanted to run a dockerized pihole, after I saw this post, but I did not get it working. So I discarded this idea. If you want to try it yourself:
Run these commands to install docker:
opkg update
...
opkg install docker dockerd docker-compose luci-app-dockerman kmod-macvlan luci-lib-docker libnetwork
Package libnetwork (2022-07-16-0dde5c89-1) installed in root is up to date.
Package luci-lib-docker (git-21.166.52164-fe795d5) installed in root is up to date.
Package docker (20.10.18-1) installed in root is up to date.
Package dockerd (20.10.18-1) installed in root is up to date.
Package docker-compose (2.3.3-1) installed in root is up to date.
Package luci-app-dockerman (v0.5.13) installed in root is up to date.
Package kmod-macvlan (5.10.146-1) installed in root is up to date.
alternatively I’ve tried these after a reset:
opkg update && opkg install docker luci-app-dockerman docker-compose dockerd kmod-macvlan
...
Configuring kmod-macvlan.
Configuring zlib.
Configuring libcap.
Configuring libopenssl1.1.
Configuring libuv1.
Configuring libwebsockets-full.
Configuring libxtables12.
Configuring kmod-nf-ipt.
Configuring kmod-ipt-core.
Configuring kmod-ipt-extra.
Configuring iptables-mod-extra.
Configuring kmod-lib-zlib-deflate.
Configuring kmod-br-netfilter.
Configuring liblzo2.
Configuring libiptext0.
Configuring tini.
Configuring kmod-veth.
Configuring kmod-ipt-conntrack.
Configuring luci-lib-docker.
Configuring ttyd.
Configuring libseccomp.
Configuring kmod-lib-xor.
Configuring libmount1.
Configuring kmod-nf-nat6.
Configuring kmod-crypto-acompress.
Configuring kmod-nf-ipt6.
Configuring kmod-ip6tables.
Configuring docker.
Configuring ca-certificates.
Configuring libattr.
Configuring kmod-lib-lzo.
Configuring kmod-lib-zlib-inflate.
Configuring kmod-lib-raid6.
Configuring kmod-lib-zstd.
Configuring kmod-fs-btrfs.
Configuring btrfs-progs.
Configuring runc.
Configuring containerd.
Configuring libip4tc2.
Configuring libip6tc2.
Configuring libiptext6-0.
Configuring xtables-legacy.
Configuring iptables-zz-legacy.
Configuring ip6tables-zz-legacy.
Configuring kmod-ipt-nat.
Configuring kmod-ipt-nat6.
Configuring kmod-ipt-physdev.
Configuring kmod-nf-ipvs.
Configuring libnetwork.
Configuring dockerd.
Configuring luci-compat.
Configuring luci-app-dockerman.
Configuring docker-compose.


reboot
If you try to run the hello-world docker container, it will fail:
docker run hello-world
Unable to find image 'hello-world:latest' locally
latest: Pulling from library/hello-world
7050e35b49f5: Pull complete
Digest: sha256:faa03e786c97f07ef34423fccceeec2398ec8a5759259f94d99078f264e9d7af
Status: Downloaded newer image for hello-world:latest
docker: Error response from daemon: operation not supported.
See 'docker run --help'.
Setup external USB storage
I think this is related to squashFS and its overlayFS that is used on OpenWRT. Docker container might work if their configuration and mounted folders are on external disk in a different file format. The DFRobot board has a USB-C USB2.0 port which needs to be enabled. Edit the /boot/config.txt and add this to the bottom of the file: dtoverlay=dwc2,dr_mode=host. Now safe the file and reboot, the USB-C port on the side should now be working as a regular USB board. I’ve ordered a small Samsung USB-C Stick and format it with ext4, so that I could use it as storage for the docker installation.
First, install all the required packages. I’ve followed these two wiki pages.
opkg update
opkg list-installed | grep usb
# if kmod-usb-core is not listed:
opkg install kmod-usb-core
insmod usbcore
opkg update && opkg install block-mount e2fsprogs kmod-fs-ext4 kmod-usb-storage kmod-usb2 kmod-usb3
# see recognized devices, in my case its /dev/sda
ls -al /dev/sd*
# format the stick with ext4
mkfs.ext4 /dev/sda1
# create a fstab file
block detect | uci import fstab
# mount the drive on startup
uci set fstab.@mount[0].enabled='1' && uci set fstab.@global[0].anon_mount='1' && uci commit fstab
# mount the device
/etc/init.d/fstab boot
I’ve moved all my docker-compose.yml and changed the mounted container paths to the USB stick which is now mounted under /mnt/sda1/. I’ve retried it but its still failing:
root@CM4:/docker# mv /overlay/upper/docker/
docker-compose.yml  pihole/
root@CM4:/docker# mv /overlay/upper/docker /mnt/sda1
root@CM4:/docker# cd /mnt/sda1
root@CM4:/mnt/sda1# ls
docker      lost+found
root@CM4:/mnt/sda1# cd docker/
root@CM4:/mnt/sda1/docker# vi docker-compose.yml
root@CM4:/mnt/sda1/docker# docker-compose up
[+] Running 1/8
 ⠇ pihole Pulling                                                         21.9s
   ⠿ 3d898485473e Pull complete                                           18.8s
   ⠸ 727a90973c44 Extracting       56.93MB/56.93...                       19.4s
   ⠸ 4f4fb700ef54 Download complete                                       19.4s
   ⠸ 0913f4c294c9 Download complete                                       19.4s
   ⠸ 0c82493c29b6 Download complete                                       19.4s
   ⠸ 2bdb593d43ee Download complete                                       19.4s
   ⠸ 502659e280ad Download complete                                       19.4s
failed to register layer: operation not supported
I’ve stopped the dockerd process manually and restarted it again:
root@CM4:~# kill 1693
root@CM4:~# ps|grep docker
 4108 root      1248 S    grep docker
root@CM4:~# /usr/bin/dockerd --config-file=/tmp/dockerd/daemon.json
WARN[0000] containerd config version `1` has been deprecated and will be removed in containerd v2.0, please switch to version `2`, see https://github.com/containerd/containerd/blob/main/docs/PLUGINS.md#version-header
WARN[2022-11-14T21:13:36.441705803Z] failed to load plugin io.containerd.snapshotter.v1.devmapper  error="devmapper not configured"
WARN[2022-11-14T21:13:36.442474461Z] could not use snapshotter devmapper in metadata plugin  error="devmapper not configured"
ERRO[2022-11-14T21:13:36.444930617Z] failed to initialize a tracing processor "otlp"  error="no OpenTelemetry endpoint: skip plugin"
ERRO[2022-11-14T21:13:36.480518895Z] failed to mount overlay: invalid argument     storage-driver=overlay2
ERRO[2022-11-14T21:13:36.480729856Z] exec: "fuse-overlayfs": executable file not found in $PATH  storage-driver=fuse-overlayfs
ERRO[2022-11-14T21:13:36.489945894Z] AUFS was not found in /proc/filesystems       storage-driver=aufs
ERRO[2022-11-14T21:13:36.502008861Z] failed to mount overlay: invalid argument     storage-driver=overlay
ERRO[2022-11-14T21:13:36.502083397Z] Failed to built-in GetDriver graph devicemapper /opt/docker
WARN[2022-11-14T21:13:36.509760954Z] Unable to find memory controller
WARN[2022-11-14T21:13:36.584084474Z] Could not load necessary modules for IPSEC rules: protocol not supported
Conclusion
OpenWRT seems to be a nice solution to get a linux based router running on the Raspberry Pi. The installation itself and keeping it updated for newer OpenWRT versions seem to be easy enough. Running Docker on OpenWRT on a Rasperry Pi doesn’t seem to work, at least not with the official image. But that’s fine, I’ll keep it just as a very performant router and keep the fun stuff to other Raspberry Pis or my Synology NAS.